
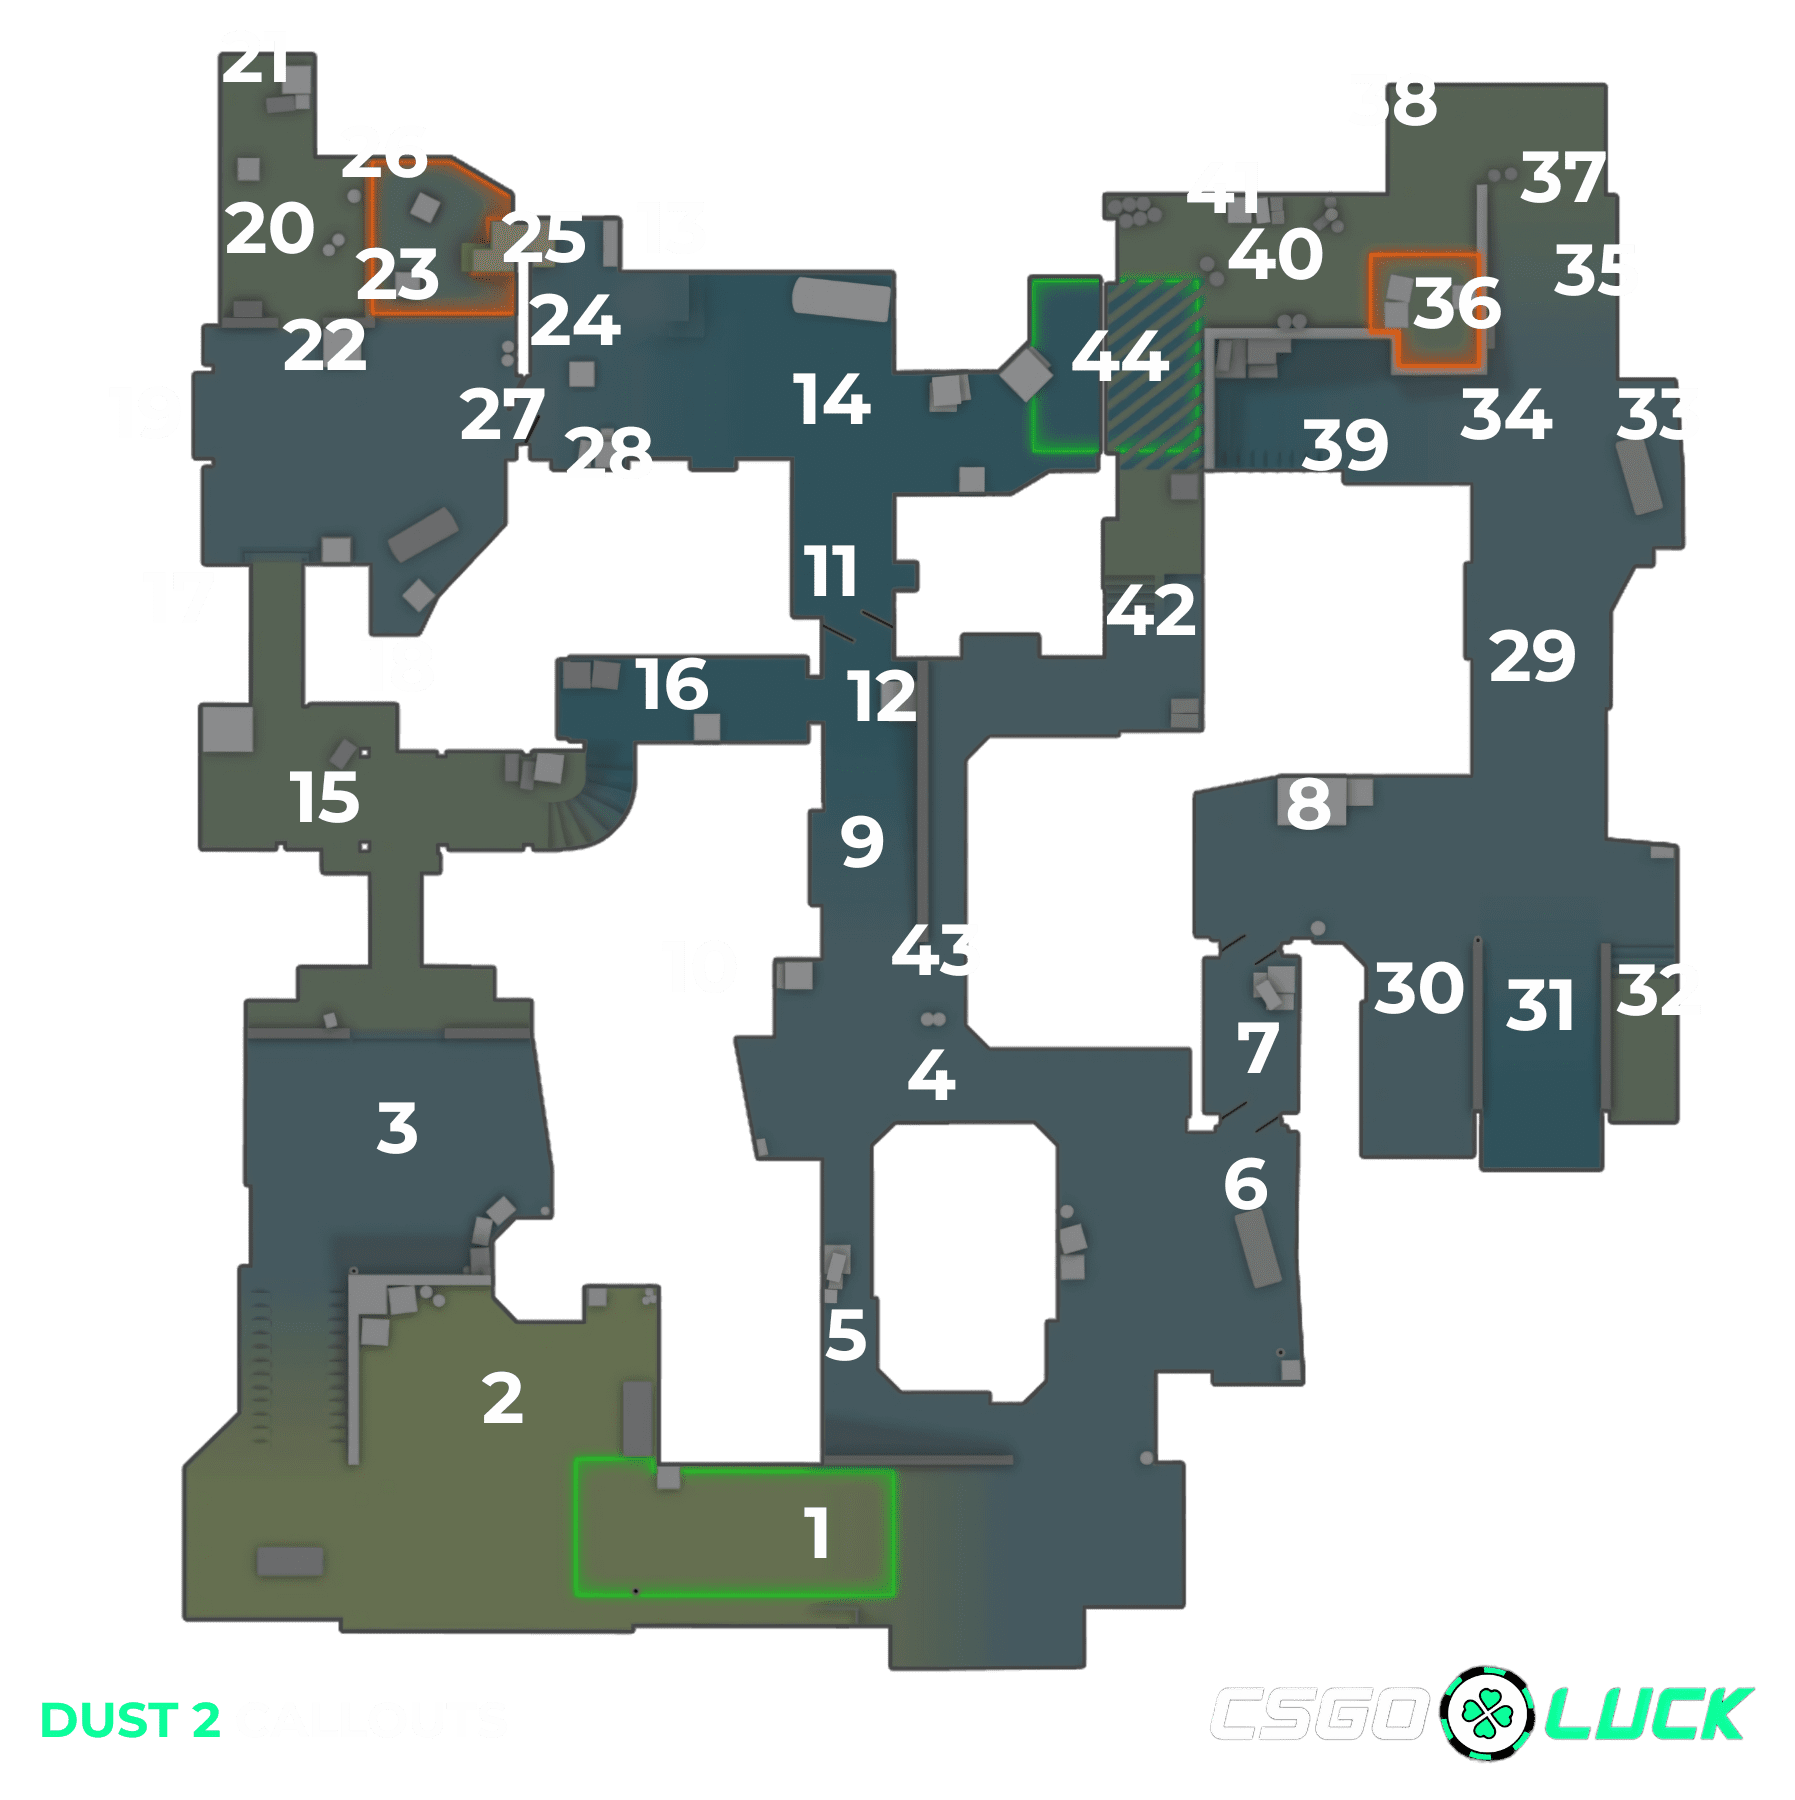
Dust 2 Callouts


-
1T Spawn: Starting point for Terrorists each round, crucial for planning the initial strategy.
-
2T Plat: Elevated platform near T Spawn providing a vantage point over T Ramp and the surrounding area.
-
3Outside Tunnels: The exterior area leading to B Tunnels, often a congregation point for Terrorists pushing towards B Site.
-
4Top Mid: The area near T Spawn at Mid, serving as a staging area for assaults on Catwalk or A Short.
-
5Suicide: A risky path from T Spawn to Mid, exposed to sniper fire from CTs at Mid Doors.
-
6Outside Long: The area approaching Long Doors from T Spawn, a typical route for Terrorists.
-
7Long Doors: The double-door entrance to A Long, a critical choke point contested by both teams
-
8Blue: A large crate opposite Long Doors, offering cover when moving towards A Long.
-
9Mid: The central corridor of Dust 2, linking T Spawn to CT Mid, vital for map control
-
10Palm: Now marked by a telephone mast at the beginning of Mid, near Catwalk, where a palm tree once stood.
-
11Mid Doors: Large central doors at Mid, a focal point for sniper duels and quick rotations.
-
12Xbox: A large box in Mid that players can use to jump to Catwalk, crucial for accessing A Short.
-
13Scaffolding: Construction structure in CT Mid opposite B Window, often used as a tactical waiting area.
-
14CT Mid: The middle area between CT Spawn and B Site, a battleground for mid control.
-
15Upper B Tunnels: Part of B Tunnels where Terrorists decide whether to continue towards B Site or pivot to Mid.
-
16Lower B Tunnels: A junction within B Tunnels offering routes towards both B Site and Mid.
-
17Close: A corner on B Site close to the entrance from Tunnels, often used by CTs for surprise engagements.
-
18B Closet (or B Car): A corner on B Site that includes a car, providing cover and a strategic hold point.
-
19Fence: A protective barrier on B Site offering concealment for CTs against Terrorists coming from Tunnels.
-
20B Plat: An elevated area on B Site, essential for overseeing the Tunnels entrance and defending the bomb site.
-
21Back Plat: A hidden area behind B Site, perfect for defensive plays and guarding against a retake.
-
22Big Box: A prominent box on B Site that can be used for cover, similar in function to Xbox on Mid.
-
23Double Stack: Two stacked boxes on B Site, providing an additional layer of cover and strategic positioning.
-
24B Default Plant: The standard bomb planting area on B Site, commonly targeted in plant strategies.
-
25B Window: A window on B Site offering sightlines to CT Mid and a path to jump through.
-
26B Back Site: The area behind the B Site plant zone, facing the Tunnels entrance.
-
27B Doors: The main passage between B Site and CT Mid, crucial for rotations and retakes.
-
28B Boxes: Boxes located outside B Doors, used for strategic cover or to ambush enemies transitioning from B Site.
-
29A Long: The lengthy corridor leading to A Site, a major route for Terrorists coming through Long.
-
30Side Pit: A niche near Pit adjacent to Long Doors, providing a tactical position for ambushes.
-
31Pit: A key area along Long with a downward slope, providing a strong defensive position against attackers from Long Doors.
-
32Pit Plat: An elevation near Pit, allowing players, especially snipers, to oversee A Site and A Long.
-
33A Car: A strategically placed car on A Long, offering cover for CTs to engage Terrorists.
-
34A Cross: The intersection area visible from A Short, A Long, and A Site, critical for crossfire setups.
-
35A Ramp: A sloped area leading up to A Site from A Long, used during site assaults and retakes.
-
36A Default Plant: The preferred planting area on A Site marked by a visible 'A'.
-
37Barrels: Located behind A Site, used for cover and strategic positioning during site holds.
-
38Goose: A closed-off area at A Site known for its distinctive goose graffiti, ideal for close-quarters defense.
-
39Elevator: A corner of A Site near CT Spawn, used frequently in retakes to access A Platform.
-
40A Platform: The main area of A Site where the bomb is often planted, crucial for holding and defending A Site.
-
41A Ninja: A concealed spot on A Platform, often used for stealthy defuse attempts.
-
42Stairs: Connecting Catwalk to A Short, these stairs are pivotal for facilitating movements between Mid and A Site.
-
43Catwalk: Elevated path from Top Mid to A Site, crucial for A Short pushes.
-
44CT Spawn: Counter-Terrorists' starting area, close to both A Site and Mid.
List of All the Updated Callouts for Dust 2
To make it easy for you to navigate all the available callouts for Dust 2, we have provided a clear description for each one, and organized them properly in different categories.
Terrorist (T) Areas and Paths
- T Spawn: Starting point for Terrorists each round, crucial for planning the initial strategy.
- T Plat: Elevated platform near T Spawn providing a vantage point over T Ramp and the surrounding area.
- Outside Tunnels: The exterior area leading to B Tunnels, often a congregation point for Terrorists pushing towards B Site.
- Top Mid: The area near T Spawn at Mid, serving as a staging area for assaults on Catwalk or A Short.
- Suicide: A risky path from T Spawn to Mid, exposed to sniper fire from CTs at Mid Doors.
- Outside Long: The area approaching Long Doors from T Spawn, a typical route for Terrorists.
- Long Doors: The double-door entrance to A Long, a critical choke point contested by both teams.
- Blue: A large crate opposite Long Doors, offering cover when moving towards A Long.
Mid and Connector Areas
- Mid: The central corridor of Dust 2, linking T Spawn to CT Mid, vital for map control.
- Palm: Now marked by a telephone mast at the beginning of Mid, near Catwalk, where a palm tree once stood.
- Mid Doors: Large central doors at Mid, a focal point for sniper duels and quick rotations.
- Xbox: A large box in Mid that players can use to jump to Catwalk, crucial for accessing A Short.
- Scaffolding: Construction structure in CT Mid opposite B Window, often used as a tactical waiting area.
- CT Mid: The middle area between CT Spawn and B Site, a battleground for mid control.
B Site and Surroundings
- Upper B Tunnels: Part of B Tunnels where Terrorists decide whether to continue towards B Site or pivot to Mid.
- Lower B Tunnels: A junction within B Tunnels offering routes towards both B Site and Mid.
- Close: A corner on B Site close to the entrance from Tunnels, often used by CTs for surprise engagements.
- B Closet (or B Car): A corner on B Site that includes a car, providing cover and a strategic hold point.
- Fence: A protective barrier on B Site offering concealment for CTs against Terrorists coming from Tunnels.
- B Plat: An elevated area on B Site, essential for overseeing the Tunnels entrance and defending the bomb site.
- Back Plat: A hidden area behind B Site, perfect for defensive plays and guarding against a retake.
- Big Box: A prominent box on B Site that can be used for cover, similar in function to Xbox on Mid.
- Double Stack: Two stacked boxes on B Site, providing an additional layer of cover and strategic positioning.
- B Default Plant: The standard bomb planting area on B Site, commonly targeted in plant strategies.
- B Window: A window on B Site offering sightlines to CT Mid and a path to jump through.
- B Back Site: The area behind the B Site plant zone, facing the Tunnels entrance.
- B Doors: The main passage between B Site and CT Mid, crucial for rotations and retakes.
- B Boxes: Boxes located outside B Doors, used for strategic cover or to ambush enemies transitioning from B Site.
A Site and Surroundings
- A Long: The lengthy corridor leading to A Site, a major route for Terrorists coming through Long.
- Side Pit: A niche near Pit adjacent to Long Doors, providing a tactical position for ambushes.
- Pit: A key area along Long with a downward slope, providing a strong defensive position against attackers from Long Doors.
- Pit Plat: An elevation near Pit, allowing players, especially snipers, to oversee A Site and A Long.
- A Car: A strategically placed car on A Long, offering cover for CTs to engage Terrorists.
- A Cross: The intersection area visible from A Short, A Long, and A Site, critical for crossfire setups.
- A Ramp: A sloped area leading up to A Site from A Long, used during site assaults and retakes.
- A Default Plant: The preferred planting area on A Site marked by a visible ‘A’.
- Barrels: Located behind A Site, used for cover and strategic positioning during site holds.
- Goose: A closed-off area at A Site known for its distinctive goose graffiti, ideal for close-quarters defense.
- Elevator: A corner of A Site near CT Spawn, used frequently in retakes to access A Platform.
- A Platform: The main area of A Site where the bomb is often planted, crucial for holding and defending A Site.
- A Ninja: A concealed spot on A Platform, often used for stealthy defuse attempts.
Connector and Rotations
- Stairs: Connecting Catwalk to A Short, these stairs are pivotal for facilitating movements between Mid and A Site.
- Catwalk: Elevated path from Top Mid to A Site, crucial for A Short pushes.
Counter-Terrorist (CT) Areas
- CT Spawn: Counter-Terrorists’ starting area, close to both A Site and Mid.
Now you have all the callouts available for Dust 2 at your disposal, so you can start using them for effective communication in the game, be it as a T or CT. If you’re playing competitively, this will mark a clear difference, helping you and your team achieve outstanding results.
Below we will explain why you should invest your time into learning callouts for Dust 2, so you can get motivated to start memorizing them today.
Why Is It a Good Idea to Use Callouts in Dust 2?
If you are playing for fun with your friends, you don’t really need to use callouts. However, if you’re playing competitively, and you’re aiming at the big leagues, it’s fundamental to learn how to use the Dust 2 callouts, as it’s the most efficient way to communicate with your teammates, and hence they’re key for running specific strategies and tactics.
Instead of wasting precious time and energy communicating with your teammates, you can be a lot more concise and efficient by using callouts, and it will be reflected on the performance of your team.
Therefore, we recommend you to study this guide and share it with your teammates, because using the callouts will mark a before and after when playing at Dust II, as it will allow you all to coordinate your movements, strategies and tactics with complete precision.
And if you’re wondering how to learn the callouts, there’s no better way to accomplish it than by playing the map a lot of times with your team, and using the callouts over and over again. This is the unique way by which you’ll memorize them and learn how to use them properly.