
Inferno Callouts


-
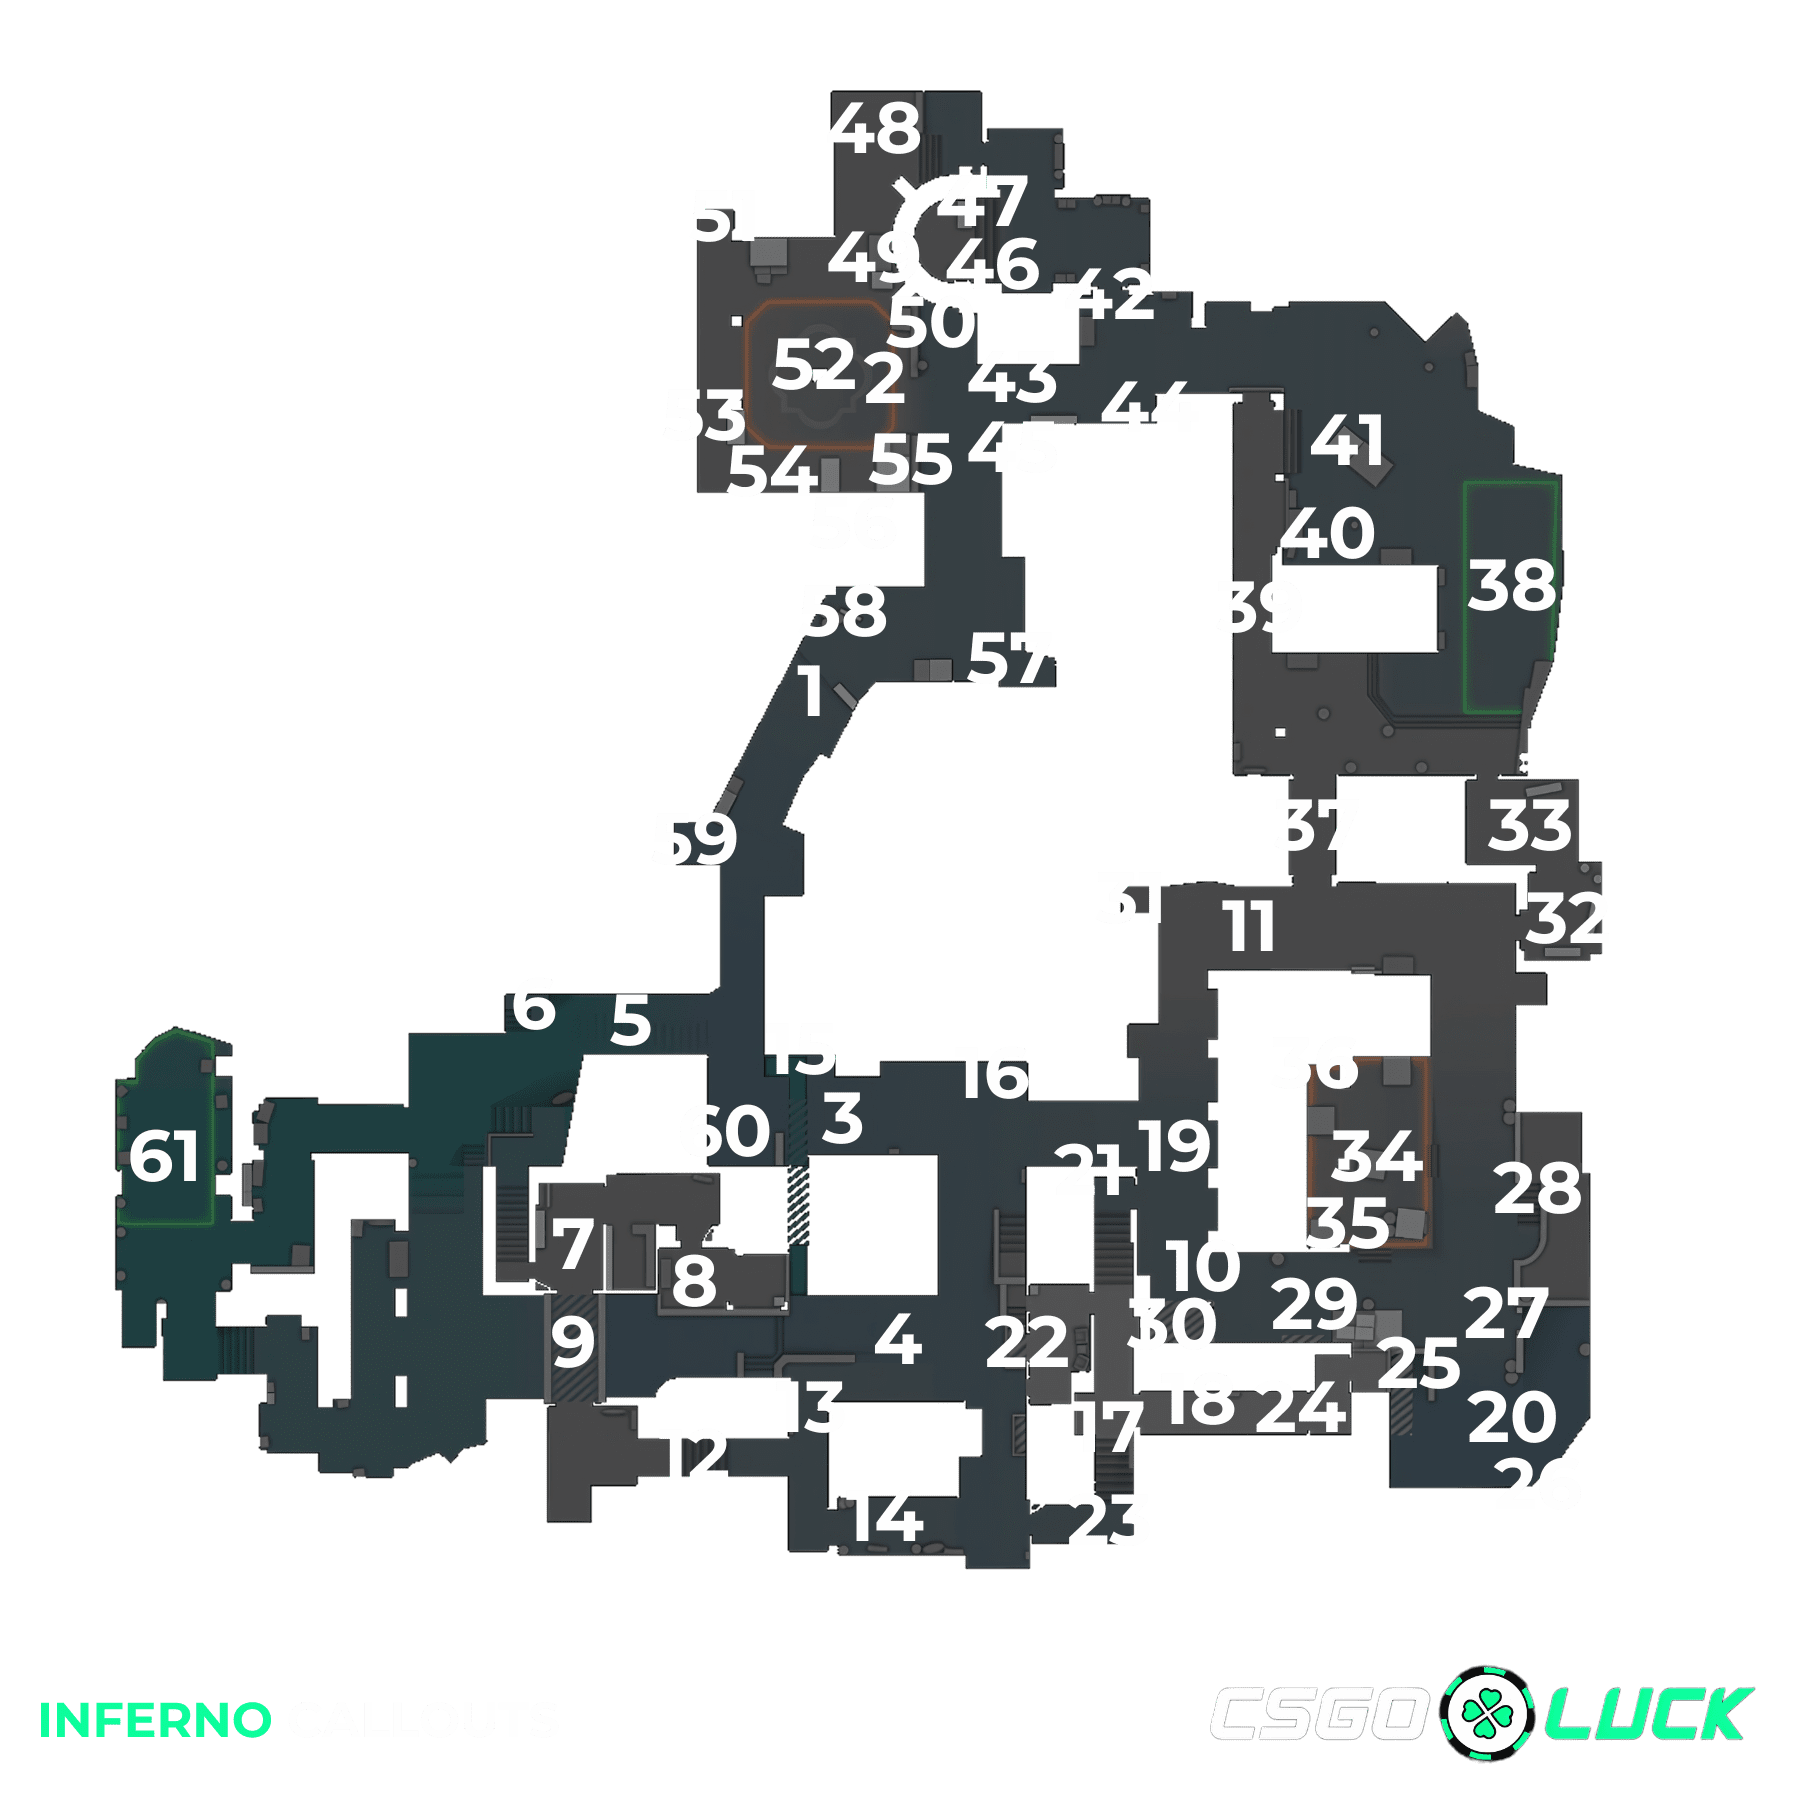
1Banana: The narrow pathway that ascends from T Ramp and Bottom Mid up towards the B Site, known as the most iconic spot on Inferno.
-
2B Site: The bomb plant area on the B side of the map.
-
3Mid: The central open area of the map, connecting T Spawn to the A side.
-
4Second Mid: A smaller midsection on Inferno, running between T Apartments and directly opposite Window and CT Apartments.
-
5T Ramp: The ramp leading from T Spawn to Mid, offering a view towards Top Mid where CTs often hold, making it a common spot for AWP duels with CT AWPers in Mid.
-
6Ledge: A small elevated spot behind T Ramp that provides a different angle to view Top Mid from.
-
7Living Room: The upstairs area in some of the apartments near T Spawn and T Apps.
-
8Balcony: Extends from Living Room and T Apps, offering a good view of Second Mid and Apartments.
-
9Bridge: Connects Living Room to the rest of T Apartments and faces the Window area in CT Apartments.
-
10A Short: The pathway towards A that passes by CT Apartments and Truck.
-
11A Long: The pathway towards A that passes by Arch and Library, used to split B from CT Spawn.
-
12T Apartments: The apartment structure running along the bottom side of Second Mid.
-
13Second Mid Door: The door that exits T Apps into Second Mid / Alt Mid.
-
14Back Alley: The final stretch of T Apartments connecting to just outside the Stairs section of CT Apartments.
-
15Underpass - A small underground area connecting Mid and Second Mid, requiring players to crouch at times. Also known as Mexico.
-
16Bench: The bench located directly opposite the crossover from Second Mid to Mid.
-
17Second Mid Stairs: Stairs located underneath Window in CT Apartments, right at the top of Second Mid.
-
18CT Apartments: The main set of apartments on Inferno, commonly referred to as "Apps" or "Apartments."
-
19Top Mid: The side of Mid held by CTs by default, referring to the choke point of Mid before it splits into Short and Arch sides, and the space between where CTs commonly hold.
-
20Pit: The lowered area on the A Bombsite below Balcony and CT Apps, a common CT defense spot.
-
21Boiler: The doorway from CT Apartments to Top Mid, slightly towards A Short.
-
22Window: The large, exposed window at the front of CT Apartments overlooking Second Mid, providing good vision but very open.
-
23Stairs: The stairway in CT Apartments connecting Second Mid to CT Apps.
-
24Close Apartments: The hallway along CT Apartments opening onto the Balcony above Pit, commonly used by Ts attacking A from Apps.
-
25Balcony: The balcony above Pit on the A Bombsite, next to the exit of CT Apps.
-
26Dosia: The bottom right-hand corner of Pit, named after a pro player’s grenade that ensured two opponents were killed by the bomb explosion.
-
27Cemetery: The stone wall at the back of Pit facing directly from Balcony when exiting CT Apps.
-
28Graveyard: The area towards the back of the A Site, where players can hide behind walls to remain difficult to spot.
-
29Truck: The truck next to A Short on the A Site, used to jump onto Balcony and CT Apps.
-
30Patio: The small, porched section of A Short looking directly onto Top Mid, a common CT crossfire setup spot in Mid.
-
31Long Corner: The corner in A Long opposite Library, usually cleared with a molotov.
-
32Library - Located just outside the A Site, directly accessible from CT Spawn.
-
33Kitchen: Located next to Library, closer to CT Spawn than A.
-
34A Site: The bomb plant area on the A side.
-
35Close Left: The box to the immediate left of A when approaching from Short / Truck Side.
-
36Back Site (A): The far side of the A Bombsite when approaching from Short / Truck Side.
-
37Arch: The archway leading from A Long towards Speedway, CT Spawn, and ultimately the B Site.
-
38CT Spawn: The starting location for the Counter-Terrorists each round.
-
39Speedway: The walkway from Arch to outside B and next to Construction.
-
40Terrace: The flowered terrace next to CT Spawn, overlooking Well and Speedway.
-
41Well: The well near CT Spawn, en route to the B Site.
-
42Truck: Located just outside of Construction, near the B Site.
-
43CT - The exposed area near CT Spawn that Ts need to smoke off when attacking the B Site to avoid being shot from near CT Spawn.
-
44Tree: The dark corner opposite the exit to Construction, near CT Spawn.
-
45CT Boost: A powerful boost position near CT on B Site, offering a view even when CT is smoked off.
-
46Construction: A large, ruinous area just outside B.
-
47Sand Bags (Construction): Sandbags at the back of Construction that players can hide behind.
-
48Garden: The green area immediately outside Construction when exiting towards the B Site.
-
49Coffins: Coffins at the back of B Site, providing a good headshot position for defense.
-
50Grill: The grill just outside B Bombsite, suitable for planting near.
-
51Dark: The shadowy corner at the back of B Site where defenders can hide.
-
52Fountain: The water fountain in the middle of B Site.
-
53Quad: A stack of boxes at the back of B Site, a strong defensive position.
-
542nd: A cubby next to a set of boxes on B Site, closest to Quad and facing Fountain.
-
551st: A cubby between two sets of boxes, immediately to the left of B Site when attacking from Banana.
-
56Boost: The boosted spot next to 1st on B Site, providing good vision towards players pushing from Banana.
-
57Sand Bags (B): Sandbags on Banana, often molotov’d to clear out hidden players.
-
58Car: The location at the top of Banana, historically a car in early Counter-Strike.
-
59Logs: A small cubby at the bottom of Banana with logs in the space.
-
60Bottom Mid: The side of Mid closest to T Spawn, near the Underpass exit.
-
61T Spawn: Spawn point for the Terrorist team.
Why Is It Important To Know A Map’s Callouts?
The map’s design encourages strategic plays, with long sightlines in the middle and close-quarter combat in apartments and banana. Its blend of open areas and confined spaces demands both tactical team coordination and individual skill, making it a perennial favorite in competitive play. The map’s aesthetic charm and complex structure contribute to its enduring popularity.
Basically, callouts are standardized shortcuts for map locations, allowing for swift and accurate communication. Callouts create a shared mental map for your team. By knowing places such as “under balcony” on Dust 2 or “tetris” on Mirage, everyone instantly pictures the same location. This shared understanding eliminates confusion and allows for coordinated plays.
Calling out enemy positions, rotations, and equipment also allows your team to formulate winning strategies. Clear communication fosters trust and cooperation within the team. When teammates understand callouts, they can rely on each other’s information and react cohesively. This eliminates hesitation and missed opportunities, leading to smoother rotations, coordinated attacks, and ultimately, more wins.
At the end of the day, callouts are a community-driven language. While some variations might exist, such as “newbox” on Inferno being called “Stewie” after Jake “Stewie2k” Yip’s famous 14-15 clutch at the Boston Major, focus on learning the most common ones used by your teammates or in the region you play. Don’t be afraid to ask for clarification if you’re unsure about a callout.