
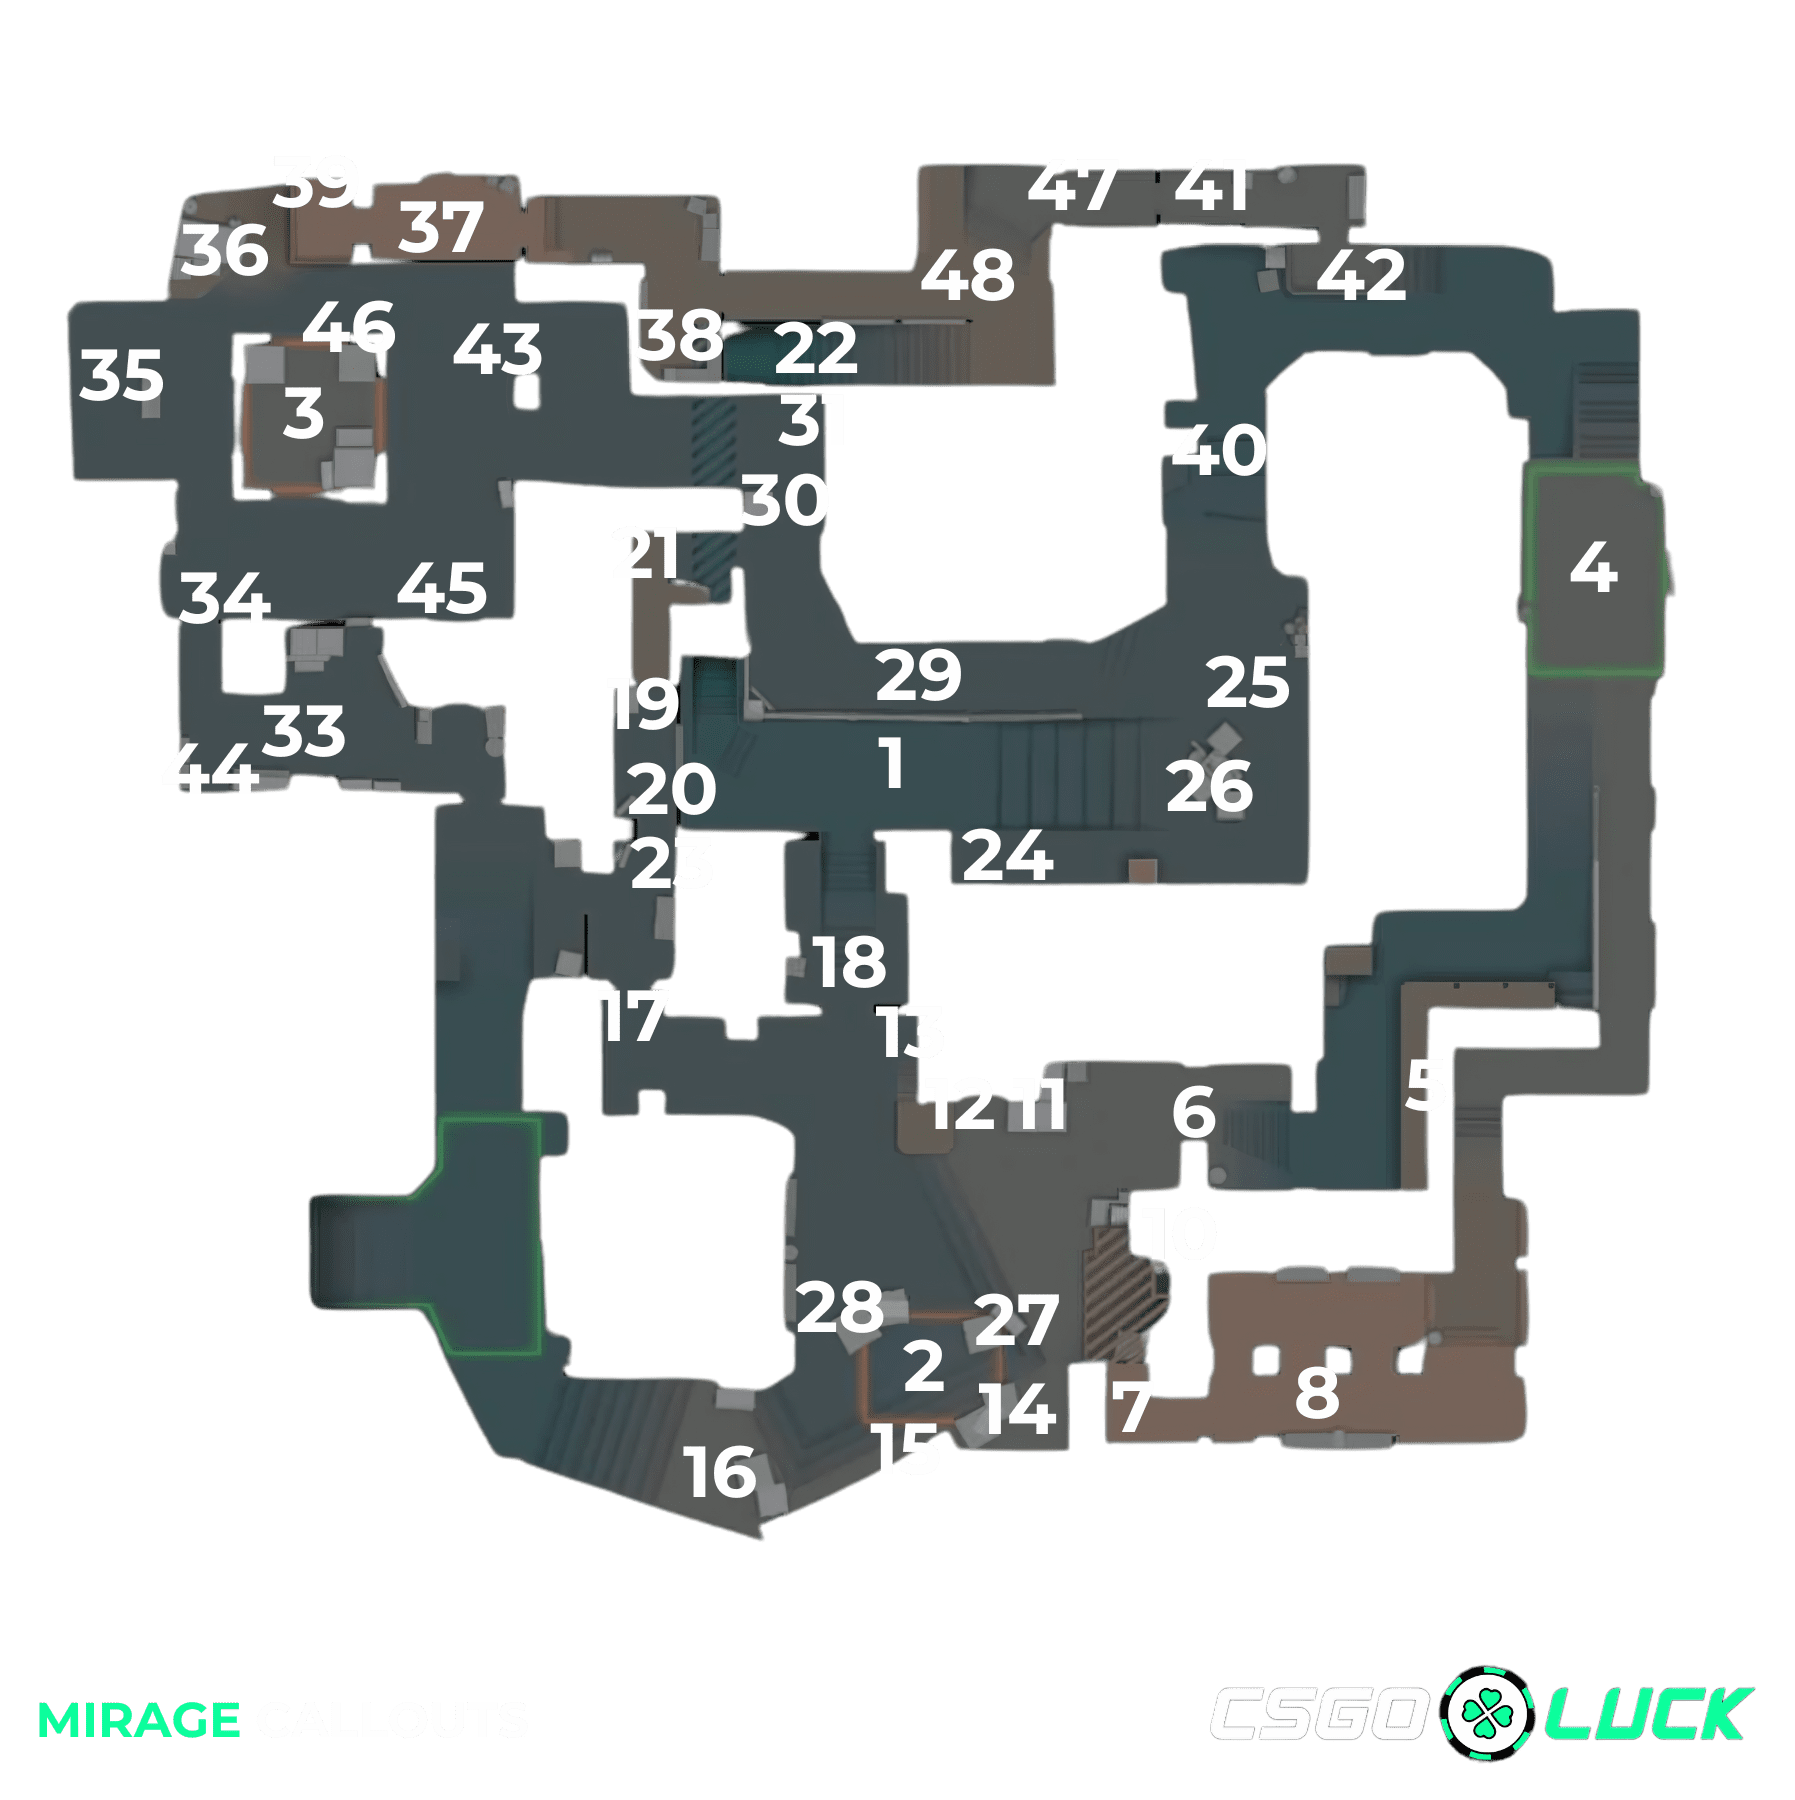
Mirage Callouts


-
1Mid: The most open area of the map, with elevation changes and lots of openings to access either bomb site.
-
2A Site: The section of the A bombsite where the bomb can be put. Since all the A Site callouts are next to each other, this is usually just called to refer to the planting space as a whole.
-
3B Site: The location of the B bombsite.
-
4T Spawn: The location at the bottom of the map where the terrorists appear.
-
5T Roof: This is the entrance before Terrorists reach A Ramp. T Roof is usually where most setups and executes happen and, for the CTs, is where they focus utility to push back the attacking side further.
-
6A Ramp: The extended ramp area after T Roof and connecting to the main A bomb site.
-
7Palace: The huge building right next to A Site. It can serve as another potential way for the Ts to gain control of A.
-
8Pillars: The many pillars inside Palace that can be used to provide different angles for hiding or attacking.
-
9Balcony: The wooden balcony that players stand on just outside of Palace. Can also be referred to as “Heaven” in some scenarios.
-
10Shadows: The portion of the A Site right under Balcony. Can also be referred to some other way, such as “Hell” or simply “Under Palace”.
-
11Tetris: The boxes right outside of A Ramp that are stacked up together in a sort of “L” shape, something that one would see in the popular puzzle game Tetris hence the name.
-
12Sandwich: The area in between Tetris and Stairs.
-
13Stairs: Stairs found at the edge of A Site that provide level vision towards palace and overlooking the rest of the bomb planting area.
-
14Firebox: A small set of boxes that serve as a hiding area for Ts in post-plant situations or CTs as they try to catch the rush. Called firebox since molotovs are commonly thrown towards the area.
-
15Ninja: The small opening where one player can hide next to Firebox and the default planting area of A Site where a CT can hide to grab a quick kill, since it usually does not get fully checked or cleared.
-
16CT: The general direction where CT Spawn is, but more commonly referred to as the area next to Ticket Booth and the entrance to A Site.
-
17Jungle: The area between A Site and Sniper’s Nest/Window. Called Jungle due to its appearance in previous installments of CS.
-
18Connector: The tunnel area of the map next to Stairs and Jungle which connects the A Site to Mid.
-
19Vent: The breakable piece of metal that CT players usually destroy early in each round to grant direct access to Window.
-
20Sniper’s Nest: The favorite spot of sniper rifle users in the entire map. It gives them the perfect view of Catwalk and the rest of Mid, and is commonly smoked off by the attacking side to allow safe passageway from a skilled AWPer.
-
21Ladder Room: The room next to Sniper’s Nest and Short that features a ladder you can climb on to access Sniper’s Nest.
-
22Underpass: The underground passageway that is utilized for rotations from B Apartments to Mid and vice versa.
-
23Boost: The area where players can boost from the bottom area of Mid up to Sniper’s Nest.
-
24Chair: Chair found in a corner of Mid. Short is visible from this angle.
-
25Top Mid: The area of Mid directly opposite to Sniper’s Nest. Has boxes that T players can hide behind.
-
26Mid Boxes: The boxes on Top Mid that cover incoming Ts from defenders situated to defend control of Mid.
-
27Default: The stack of boxes on A Site that feature a red A spray painted on them.
-
28Triple Box: Three stacked boxes next to Default. A common hiding spot for those trying to defend the site.
-
29Catwalk: The area in Mid that connects to Short.
-
30B Short: The entrance to the B Site after coming from Mid and then Catwalk.
-
31Short Corner: Tight corner next to Apartments coming right out of B Short. A common hiding spot since it is a tough angle to check in the first place.
-
32Market: The building or area that connects CT Spawn to B Site.
-
33Window: The first exit from Market onto B Site. Just like Vent, this area of the map has a blocking that must be destroyed before direct access is granted.
-
34Door: The main entrance to B Site from Market.
-
35Bench: The bench beside the main planting area and next to Van.
-
36Van: The truck situated right before B Apartments. Used as a common holding spot for CTs to provide vision towards many entrance points of the site.
-
37B Apartments: The main passageway towards B Site. Usually the most common path from T Spawn to B in situations of a rush being called.
-
38Kitchen: The area right at the beginning of B Apartments. The wooden part of Kitchen can be wallbanged by those aiming at it from the outside.
-
39B Plat: The platform you walk through right after exiting B Apartments. Right beside Van.
-
40Side Alley: Part of the map between Mid and T Spawn.
-
41TV/TV Room: The part of the map where a TV can be found. Leads to B Apartments.
-
42Apps Ramp: The ramp directly connecting T Spawn to B Apartments.
-
43Arches: The double arches that serve as the entrance way to B Site from B Short. Both are also referred to “Get Right” or “Get Left” in some scenarios as a nod to former world #1 player GeT_RiGhT.
-
44Sneaky: Sneaky is the part in Market next to the fridge where players can jump up on and create an off-angle that goes largely unchecked.
-
45E Box: Located in the corner of B Site right next to Window.
-
46Boost Boxes: Boxes located on the main planting area of B Site that players can get boosted on for a potential off-angle against opponents entering the site.
-
47House: The first building that serves as the passageway towards B Apartments or Underpass. Where the TV Room is located.
-
48Back Alley: Refers to the part of the map between B Apartments and House.
Why Is It Important To Know A Map’s Callouts?
Basically, callouts are standardized shortcuts for map locations, allowing for swift and accurate communication. Callouts create a shared mental map for your team. By knowing places such as “under balcony” on Dust 2 or “tetris” on Mirage, everyone instantly pictures the same location. This shared understanding eliminates confusion and allows for coordinated plays.
Calling out enemy positions, rotations, and equipment also allows your team to formulate winning strategies. Clear communication fosters trust and cooperation within the team. When teammates understand callouts, they can rely on each other’s information and react cohesively. This eliminates hesitation and missed opportunities, leading to smoother rotations, coordinated attacks, and ultimately, more wins.
At the end of the day, callouts are a community-driven language. While some variations might exist, such as “newbox” on Inferno being called “Stewie” after Jake “Stewie2k” Yip’s famous 14-15 clutch at the Boston Major, focus on learning the most common ones used by your teammates or in the region you play. Don’t be afraid to ask for clarification if you’re unsure about a callout.